Sometimes it gets so bad, even the wooden beams are dripping! This of course causes the wet coop litter to start stinking and the deep litter method quits working because of too much moisture. Have you smelled deep litter when it gets soaked? Yuck!
Plus moisture is always bad for wood and all that wetness on the chicken coop floor can eventually cause it to rot. We don't want that happening!
Plus, insulation helps keep the coop warmer in winter without adding any heat sources which can be dangerous.
It's not just all about the coop though. Did you know that moisture is a huge contributing factor to frostbite in chickens? Many people think it's caused by cold but it's not just cold alone. Frostbite is caused by the combination of cold and moisture.This more then anything is a huge reason to try to cut down the moisture content in the coop air. So the condensation had to go!
How to insulate a chicken coop
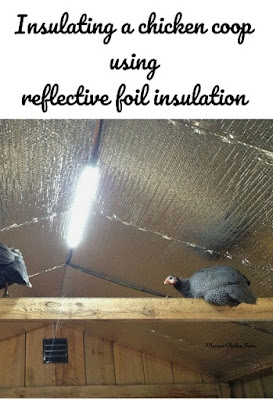
We decided to put up some insulation. You can see we used the silver heat reflective roll type of insulation, but there are several different types available.
We used a staple gun to fasten it to the wooden beams. Simply line it up and staple. Be careful not to overlap or the staples won't go into the wood all the way and may pull out easily.
Lowes has a great installation guide we followed.
The insulation went up on the coop ceiling quickly and easily and has made a huge difference in the moisture situation in the coop! For a DIY chicken coop insulation, it was really easy!
The chickens don't seem to mind it, and this particular insulation choice reflects the light from the fixtures making it seem brighter. It cost us under $100 to insulate this chicken coop, however as far as coops go at 10'X20' it is pretty large.
Each roll of this insulation was 2 feet wide by 25 feet long, so on my smaller coop I'd only need one roll.
I'm not sure what to expect as to any temperature change in the coop. The pop door is open all day long, which helps to equalize the temperature.
There is still some ventilation through the vents at each end of the coop, but I'll be keeping an eye on it and will add more if it seems there isn't enough.
Ventilation is important in chicken coops, especially in cold weather!
I can't believe the difference insulating the coop has made already....no more water drips on my head. Yeay! Plus, I haven't had to change the coop bedding since.
If you are looking for a more temporary solution, check out our post on temporary coop insulation.
~L
Looking for more information on what makes a good chicken coop for winter weather? Check out the post: Winter chicken coops. The good, the bad and the ugly!
Want information on raising chickens sent right to your email weekly? Click right here to join my list and get new posts sent directly to you the day they're published. You'll also get the free download 25 Ways to save money raising chickens.
This post contains affiliate links. If you chose to purchase something through the link, I will get a small payment from Amazon. It will not affect your purchase price. Click for full disclosure.


Oh such a good idea! I've been puzzling over the same condensation issue - thanks!
ReplyDeleteYou should try it! I think you'll be thrilled with the results.
Delete~L
Wow! Such a fascinating post about your bird coop ~ Great photos ~ ^_^
ReplyDelete(A Creative Harbor) ^_^
That is a great idea.
ReplyDeleteGreat idea and photos! We don't have enough humidity for condensation here in Colorado, but if we did, I'd be using your solution! (Hopped over from the Clever Chicks Hop)
ReplyDeleteHmmm...Great idea! Wonder if it'll work for my little coop? But we need it for BOTH warmth and condensation. The condensation hits the roof and FREEZES. Poor biddies! But they never seem too cold.
ReplyDeleteIt's about a degree or 2 warmer in there now, however a smaller coop would probably warm up a lot more. Let me know it works if you try it!
Delete~L
Did you only put it on the celing or did you cover the walls too?
ReplyDeleteWe only did the ceiling. It's important to leave some ventilation and there were some spots at the tops of the walls where they had nice airflow. Also, the main problem wasn't really the cold, but the moisture dripping from the roof and the ventilation keeps it up from dripping into the coop.
Delete~L
Love your blog on insulating and condensation. So many homes have this problem and proper insulation and ventilation make all the difference. Just thinking out the condensation you could see with your own eyes in this situation makes you wonder how much is happening in your attic right now!
ReplyDeleteDo they try to eat the insulation
ReplyDeleteMy guinea fowl did try to eat the insulation. They pulled it down in places and we had to put it back up. The chickens didn't try to eat the insulation, but only because they don't like to get up on roosts that are that high.
DeleteLisa