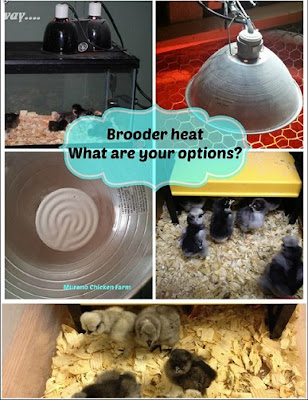
I've tried many different types of chick heat sources over the years and I've spent time compiling the information on heat sources for your brooders to help you make an informed decision. I know we all love our little chickies and really just want them to be safe and grow up happy and healthy. Sometimes things like cost and convenience have to factor into the equation though...and that's where it gets tricky.
In this comparison I will be looking at several brooder heat systems I have used over the years:
- traditional heat lamp with red bulb
- traditional heat lamp with infrared ceramic heat emitter
- reptile heat lamp and bulbs
- commercial brooder heat source (aka...Brinsea ecoglow)
Heating A Chick Brooder
1) Heat lamp and red bulbCost: $14.98
Brooder lamp with 6ft cord $9.99 250 watt red heat bulb $4.99
Convenience: Can be bought at almost any hardware store.
Upkeep: Brooder bulbs burn out and need replaced seasonally, sometimes more often as they're prone to breakage.
Flexibility: Very adjustable, just move further away from brooder
Set up: Easy. Just clamp to sturdy surface. Bulb screws in.
Safety: Questionable. Can fall and start a fire.
2)Traditional heat lamp and ceramic infrared 'bulb'Cost: $22.98
Brooder lamp with 6ft cord $9.99
Infrared ceramic heat emitter $12.99
Convenience: Brooder lamp from hardware store, infrared bulb from specialty pet store.
Upkeep: Ceramic bulbs need replaced occasionally, should last up to 2 years.
Flexibility: Very adjustable, just move further away from brooder
Set up: Easy. Just clamp to sturdy surface. Bulb screws in.
Safety: Questionable. Can fall and start a fire.3) Reptile heat lamp and bulbs
Cost: $45.97
Desert heat lighting kit $25.99
2 red heat bulbs at $4.99 each
Special screen lid to rest lighting kit on: $10.00
Convenience: Lamp, lid and bulbs at specialty pet store. Bulbs may be found in hardware stores.
Upkeep: Heat bulbs will need replaced seasonally, sometimes more often.
Flexibility: Not adjustable, though could replace bulbs with lower wattage as chicks grow.
Set up: Easy. Just screw in bulbs and set on special screen lid.
Safety: Safer, but it's because of the lid it rests on not the bulbs.4) Commercially available chick brooder
Cost: $79.99
Brinsea EcoGlow $79.99
Convenience: Available online only.
Upkeep: Will last many years without any repairs needed.
Flexibility: Adjustable, 3 different height settings.
Set up: Easy. Pop the legs into the slots you want and plug in.
Safety: Very safe. Brooder heat plate using radiant heat, you can touch it and not get burned.
(I have provided links to these products so that you can take a look at them. The prices are not all the same as what I have listed as I got my prices from chain stores available nationwide, although of course prices may vary in different areas)
What do I use? I have used them all, but prefer to use the EcoGlows whenever I can. My oldest EcoGlow is 4 years old and still going strong. I trust it much more then the heat lamps and my electric bill is much lower when I'm using those instead of heat bulbs.
This is an excellent choice for people that have chicks often or even every year as it more than pays for itself in the long run. I understand though that for the many people who only brood chicks once in a great while, it may be a bit much of an expense.
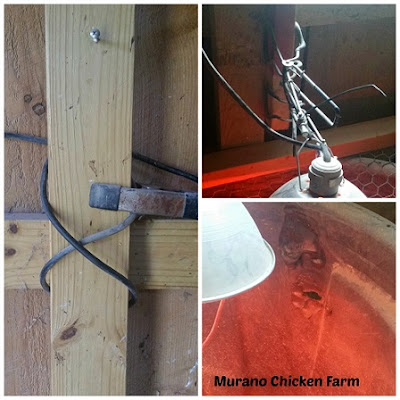
A lot of people still chose to use a heat lamp and red bulb and I wanted to address the safety issue. I know many of you have heard me say this before but: NEVER trust a heat lamp! You have no idea how serious I am about this! I add extra clamps, zipties, hooks, screens...whatever it takes attach that thing in place as much as I can!Also, never remove the metal protector cage from it. I have a screw on the wall and I attach a zip tie to it and through the loop on the top of the lamp. I wrap the cord around the wall beams if I can so if it does fall it won't hit the floor and lay in the bedding to start a fire.
I also have a coated wire lid my husband made for my brooder tubs and I keep that on when the heat lamp is in use. Basically, do everything you can to insure heat lamp safety.
My accident:
If you look in the lower right corner of the above picture you can see what happened one day when the heat lamp got knocked into and the lid wasn't on. That's a stock tub that melted! Do you know how hot it has to be to melt a stock tub? The tub was empty because I had just cleaned it and the chicks were in a crate in the yard. A rouge adult chicken jumped in to eat chick food and knocked the lamp sideways. I saw it maybe 15 minutes later and the 1/4" thick plastic had melted through! Even with the metal cage pieces still on the hood! If it had fallen into the shavings, there would have been fire. Lesson learned! Never ever trust a heat lamp!
I still use a heat lamp for brooder heat from time to time. Sometimes in the summer I swear I have more chicks than I can count and I need to use everything I have on the various tubs and crates of chicks! I always use the Brinsea brooders first though and am ever vigilant about securing and checking on heat lamps when they are in use. If you chose to use a heat lamp please be very careful. Those tiny chicks are counting on you to keep them safe!
~L
Want information on raising chickens sent right to your email weekly? Click right here to join my list and get new posts sent directly to you the day they're published. You'll also get the free download 25 Ways to save money raising chickens.
This post contains affiliate links. If you chose to purchase something through the link, I will get a small payment from Amazon. It will not affect your purchase price. Click for full disclosure.


Thank you for linking up at the May Country Fair Blog a Party! These are some great tips on keeping anyone's chickens safe and warm.
ReplyDeleteLaurie - CFBP Co-host
http://new.inlinkz.com/view.php?id=508275
What great hints and tips. We are coming into winter her in our part of Australia so I am going to keep this post book marked for when spring comes and we have chickens in the brooder. Thanks for sharing this great post with us at Good Morning Mondays. Blessings
ReplyDeleteWe are moving from a subdivision that doesn't allow chickens, to an area where we can have them once again. We did raise them successfully on the east NC coast, in a large pen with buried wire, including hardware cloth along the bottom, a sturdy henhouse for night, but now we want less chickens.
ReplyDeleteMy question is, how do we keep our hens warm in the winter months, on a high desert plateau of NM? It is much colder in winter nights, and windier. We will still have good ventilation, up high, and probably no more than 4 hens. I was wondering if one of those warming rods for towels, or that you put into a closet, attached under the roosting area, but not anywhere the hens could reach(including wired off area for cord and device) might provide just enough to keep them from freezing their little toes. I will be getting Bielefelders or Orpingtons, instead of the Astralorps I had at the coast, due to the higher amount of sun and less shade in the NM area.
One of the best ways to keep your hens toes warm at night is to provide them with a flat or wide roost. This way when they sit down their feathers will cover their toes completely keeping them warm. Thinner roosts let the toes wrap under and their feathers can't cover them as well. I don't heat my coops in winter and it gets really cold here in Pennsylvania. Make sure the coop is draft free and very little moisture inside and they should be fine! Congrats on getting a new flock!
DeleteLisa